DONN FELKER

Lessons Learned From the Software Industry

  • Home
  • About
  • Development Training
  • Fragmented Podcast
  • Learn to Work for Yourself
  • Contact

Connect

  • GitHub
  • Google+
  • Instagram
  • LinkedIn
  • RSS
  • Twitter

Powered by Genesis

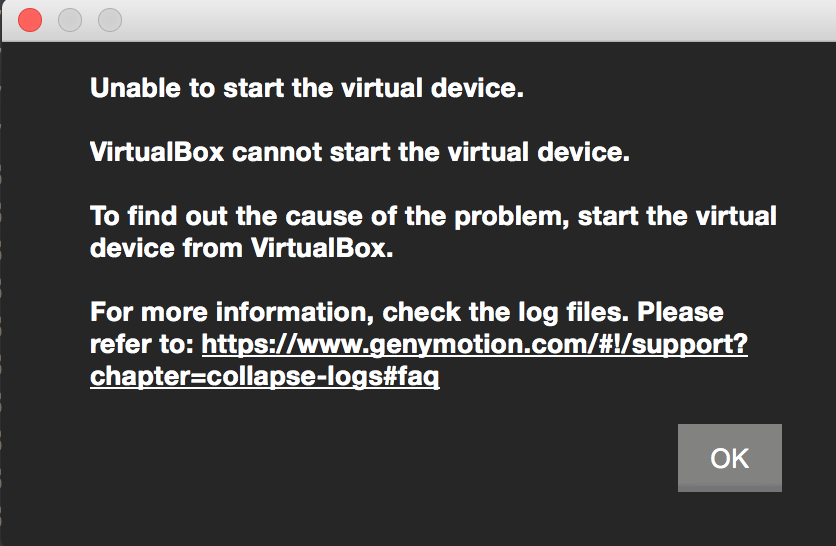
Genymotion Will Not Start Virtual Device

December 18, 2015 by Donn Felker 1 Comment

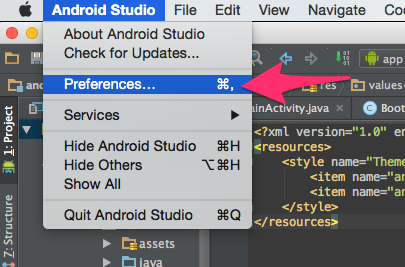
My Genymotion device will not start.

Hmmph.

Thankfully, I was able to fix the issue. Here’s how I did it – hopefully it works for you too:

The Issue

When I would attempt to start the virtual device I’d get the following message (with screenshot below):

Unable to start the virtual device. VirtualBox cannot start the virtual device. To find out the cause of the problem, start the virtual device from VirtualBox …


I then started the device in VirtualBox and received the following error:

VERR_SUPLIB_OWNER_NOT_ROOT

with the text saying “Cannot start device” or something like that. The key was the error message constant:

VERR_SUPLIB_OWNER_NOT_ROOT

I sent my logs and screenshots of Genymotion and VirtualBox to Genymotion and I was told to install new graphics drivers (smh) and upgrade VirtualBox. This error has nothing to do with graphics drivers. Anyway .. I did some digging.

The Fix

I noticed that Genymotion was installed in the /Applications folder. Ok, cool. I took a look at the permissions via the CLI with:

>ls -al

I noticed something weird … the /Applications folder was owned by someone else, not by wheel (the system admin group in OSX), myself or root. It was owned by some other user that I could not find (which is another issue altogether).

The error message states that the owner is not root. You can typically fix this with the diskutil command:

 > diskutil verifyPermissions /

This will verify all the permissions on your system (sans the homedir IIRC), telling you what is out of whack. To fix the permission issues you can run the following command:

 > diskutil repairPermissions /

After running these commands I was able to start my Genymotion device as the user has been changed back to ‘root’.

Still Stuck?

If that did not work you can try changing the owner manually like this, which changes the owner:

 > sudo chown root Applications

Filed Under: Development, Misc Tagged With: Android, development

Diff Before Commit

December 8, 2014 by Donn Felker Leave a Comment

Last week I tweeted something that got some conversations going:

One of the best habits you can get into before committing code is viewing all the changes in a diff tool. 9/10 times you forgot something.

— Donn Felker (@donnfelker) December 5, 2014

The tweet itself was not a huge novel concept and it’s something that many quality devs do every single day, many times a day. Unfortunately its also something that the majority of folks do not do. Jake expressed his beliefe that this should happen as well in this humorous reply:


@donnfelker I wish you could force open source contributors to do this. Some kind of timer + forced scroll to bottom.

— Jake Wharton (@JakeWharton) December 5, 2014

Well then … Why is reviewing your code before committing (or a code review) important?

Reviewing your code is important because you’re going to catch something you forgot to add, remove or you will see an error in your ways and you’ll fix it before you push the commit it to the server. I can’t tell you how many times (I’m talking thousands upon thousands of times) I’ve caught some invalid code during a pre-commit diff.

How many times have you accidentally pushed that code that had some old debug tracing or a red background color? Probably more than you can remember. It happens to all of us.

How To

The simplest way is to do it via the command line if you don’t use a diff tool or an IDE that supports it. I use git, here’s the command to show an inline diff in the command line interface:

git diff

or with the path to the file you’re interested in (if many file are modified)

git diff /path/to/file

If you have a difftool installed you can issue the following command:

git difftool

or with path to the the file you’re interested in (if many files are modified)

git difftool /path/to/file

With an IDEA IDE (Android Studio, WebStorm, IntelliJ, PyCharm, RubyMine, and more)

You can right click on the file in the editor and select git —> Compare with Same Repository Version and you’ll get the screen below:

Users donnfelker Documents android bootstrap source android bootstrap app src main java com donnfelker android bootstrap ui BootstrapFragmentActivity java

Using a HotKey

Personally, I avoid using the mouse at all times so I’ve set up a shortcut in all my IDEA based IDE’s. Here’s how to do that:

I’m using Android Studio here, but the process is the same for other IDEA IDE’s.

Open the Preferences:

prefs

Next in the filter, type “keymap”, you’ll see the items the filter below narrow down to simply “Keymap”

Banners and Alerts and Preferences and values v21 theme xml app android bootstrap Documents android bootstrap source android bootstrap Android Studio Beta 0 8 14

In the search box type “compare with” to filter the list of keymap options.

Preferences and values v21 theme xml app android bootstrap Documents android bootstrap source android bootstrap Android Studio Beta 0 8 14

Next right click on the “Compare with the same Repository Version” under your VCS. I’m using Git below.

Preferences and values v21 theme xml app android bootstrap Documents android bootstrap source android bootstrap Android Studio Beta 0 8 14

Now your cursor will be in the “First Stroke” box. I chose “Shift + CMD + D” for my hot key for this command. Simply press those three buttons at the same time “SHIFT + CMD + D” and the values will fill themselves in for you in the “First Stroke” box. You’ll notice at the bottom of this dialog you will show you any other key combos conflict with this key combination. In this case, there are no conflicts. Click “Ok” and and click “Ok” on the parent Preferences window and you’ll be back at your IDE.

Enter Keyboard Shortcut and Preferences

Now go back to your file, make a change, and hit “SHIFT + CMD + D” and you’re diff window will show up automatically. 🙂

Users donnfelker Documents android bootstrap source android bootstrap app src main java com donnfelker android bootstrap ui BootstrapFragmentActivity java

This can be done with any IDEA IDE, so have fun. Other IDE’s like Visual Studio, etc also have similar features, you’ll just have to hunt them out.

Enjoy!

Filed Under: Development Tagged With: Android, development, programming

Donn Felker Google Android GDE Fragmented - An Android Developer Podcast

Projects / Apps

Caster.IO
Fragmented Podcast
American Express Android
Aaptiv
AndroidJobs.IO
Groupon
MyFitnessPal
Poynt

Books

  • Android Developer Tools
  • Android App Dev For Dummies V2 (V1)
  • Android Tablet App Dev for Dummies

Categories

  • Book
  • Business
  • Development
  • Health
  • Marketing
  • Misc
  • Mobile
  • Screencasts
  • Uncategorized