DONN FELKER

Lessons Learned From the Software Industry

  • Home
  • About
  • Development Training
  • Fragmented Podcast
  • Learn to Work for Yourself
  • Contact

Connect

  • GitHub
  • Google+
  • Instagram
  • LinkedIn
  • RSS
  • Twitter

Powered by Genesis

Automating Screenshots: Simplifying Internationalization on Android

February 11, 2016 by Donn Felker 5 Comments

I’ve worked on some fairly large internationalized apps (50MM+ installs on each app) and on each app I’ve always had a problem with internationalization. It presents its own set of challenges. If you have not internationalized an app before you’ll quickly realize that your app design may not fit various locales – especially when text widgets are horizontally adjacent to each other. The text will eventually overlap or just look wonky and this can create odd UI bugs. You’ll find this out during testing, or as in my experience, when someone reports an odd text widget is overlapping another part of the UI. Finding these issues usually resulted in having your QA team go through each screen in the app to visually inspect the app for each locale. An optimal solution would be to visualize all of the different screens in the different locales so that it would be easy to inspect. Unfortunately that, solution did not exist …

While there is no silver bullet for this situation, there is a new tool that can help with this process (which also has ancillary uses as well).

I recently had the honor to work with the Fabric team – the same trusted team who brought us the Crashlytics tool that we all rely on. They were looking for some feedback on a new open source tool called screengrab. I got to try it out, and after some setup, I had an “Aha!” moment that made me want the tool immediately. It’s a tool that any pragmatic Android developer should evaluate as a possible candidate for their Android development toolbox – especially if your app is internationalized.

Let me explain why …

What is screengrab and why should I care?

Put simply, it is a command line tool that helps you take screenshots of your application at desired execution points in your functional android tests (Espresso) … in any locale.

running-screengrab


A screenshot tool? Really? Any Locale? Why Should I care about that?

Therein lies the magic …

One thing you notice during the localization effort is that during design and development strings that fit in one language (English for me) do not necessarily translate well to other languages. Meaning that a five-letter word in English may translate to a twenty letter word in another language.

This is problematic when you are dealing with horizontal space. Longer text entries will overflow onto other widgets and you’ll have a problem.

As stated above, you often don’t realize it until it’s too late because manually testing your application on various locales is difficult and extremely time intensive.

How Does screengrab Help?

The screengrab tool will help automate the process of visually inspecting the various locale output of your app. You can configure screengrab to load up different locales, run all the UI tests and take screenshots during the execution of the test on various devices and configurations at the same time … and then ….

Screengrab will output all of the screenshot files for each locale for you. You can then use those files to quickly visually inspect if there are in fact visual problems with your application and locales. 

Simply scroll through the files and check to see if anything is broken.

This can result in huge time savings when you make a feature change, add a new screen, etc.

How Do I Install It and Use it?

As usual, the Fabric team is making this as easy as possible. It’s one file to setup after the installation that anyone on your team can run once it’s checked into github (setup once, setup everyone forever).

Once installed you can start taking screenshots in your tests with the following Screengrab.screenshot(“screenshot_name”);

@Test
public void testTakeScreenshot() {
    Screengrab.screenshot("before_button_click");

    onView(withId(R.id.fab)).perform(click());

    Screengrab.screenshot("after_button_click");
}

The above code is a jUnit 4 test that allows you to take a screenshot before an action with a the tag “before_button_click”. This tag will show up on the screenshot so you can trace the execution of your test and screenshots.

Then we click on a button, then take another screenshot.

Almost done …

Configuring Various Locales

Now, lets assume you have mulitpe locales and you want to test those various locales and see the screenshot results. To do that you’ll need to provide some configuration values in the screengrabfile.

The screengrabfile was generated when you installed screengrab. You’ll want to add the following information to the screengrab file:

# locales to test
locales ['en-US', 'it-IT']

# clear all previously generated screenshots in your local output directory before creating new ones
clear_previous_screenshots true

This configures screengrab to run the US Ensligh locale and the Italian locale.

Now Lets Run It

You’ll need to make sure you’ve built your application so that you have an application APK and the test APK. Build that with the following command:

$> ./gradlew assembleDebug assembleAndroidTest

Now that the application and test app are built you’re ready to kick off screengrab. Execute the following command:

$> screengrab

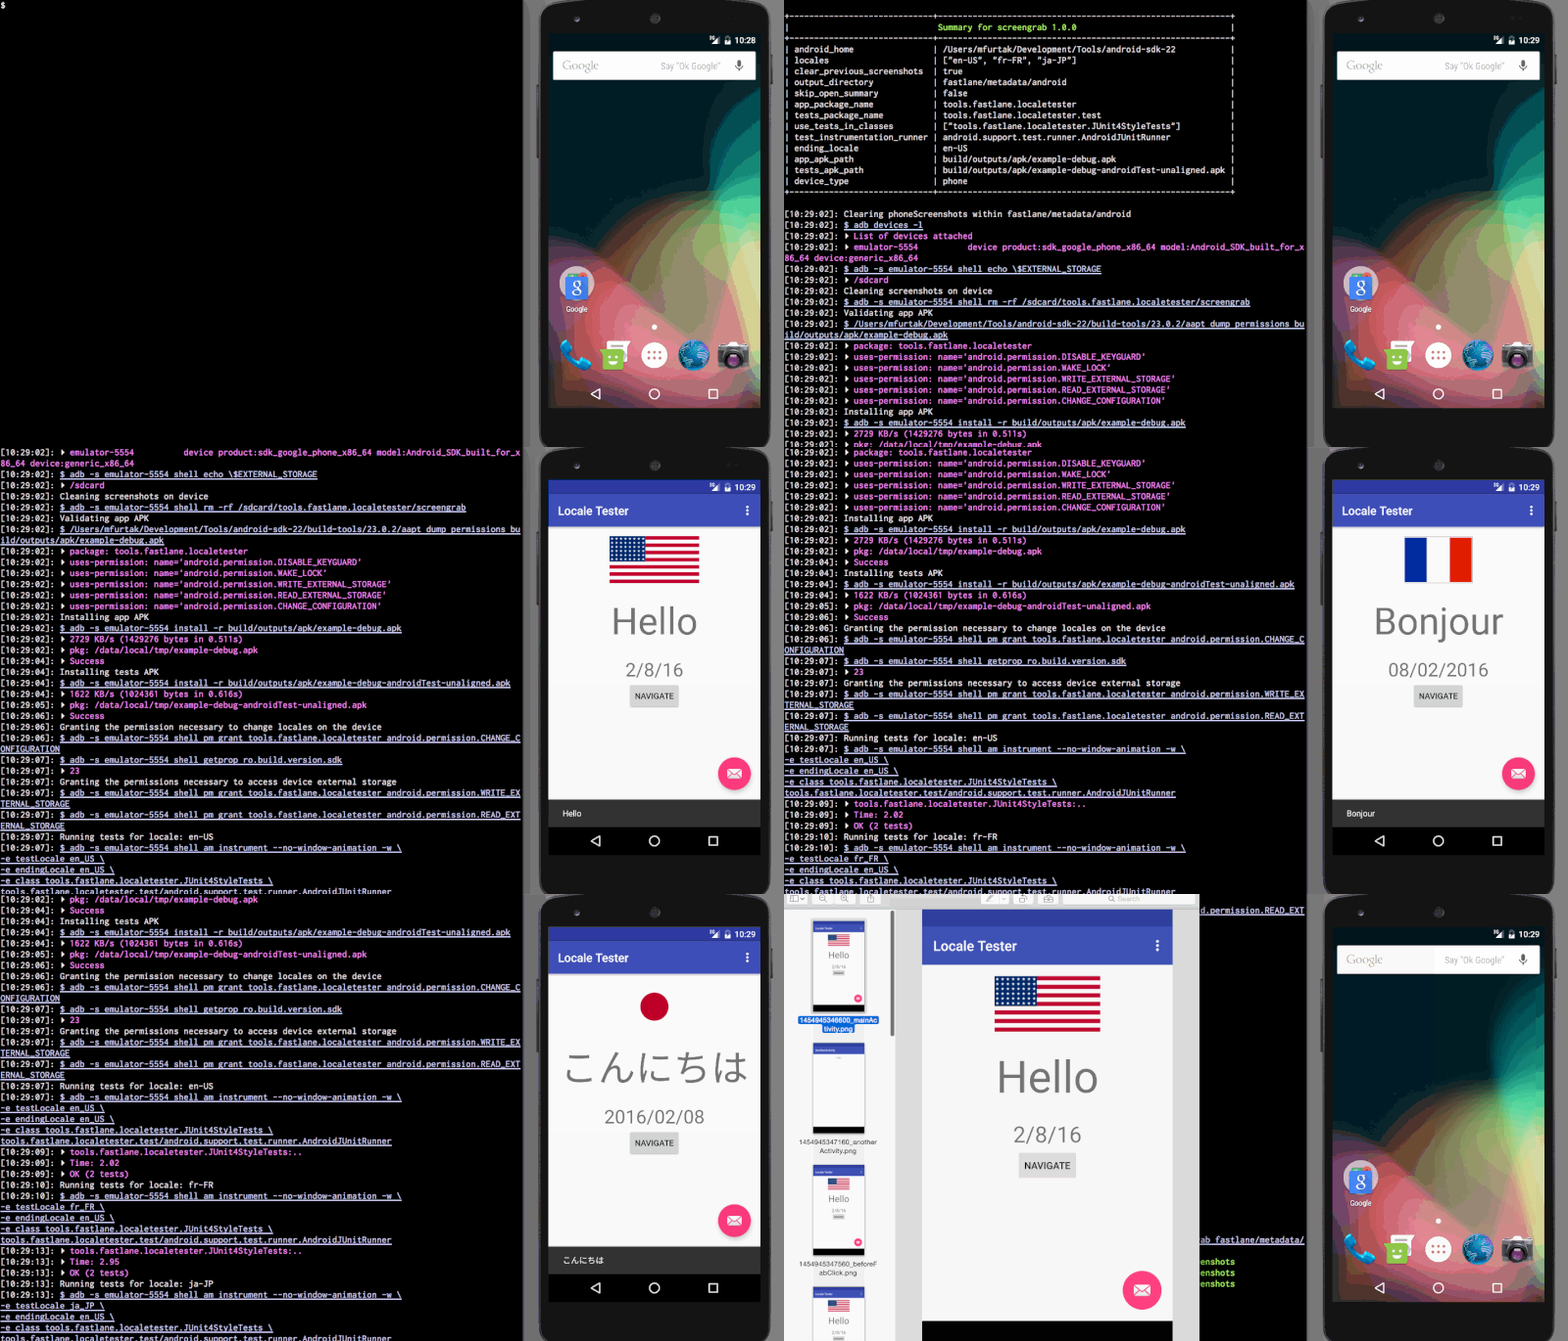
This will fire off your tests in each locale and you’ll see your device(s) reacting and your console going wild, as this gif showcases:

screengrab-output

(Click for larger)

When screengrab is done your screenshots will be stored in the fastlane/metadata/android/images directory of where you ran the screengrab command.

View The Results

Viola! Open the file to see how everything went. Here’s an example:

screengrab-output

(Click image for larger resolution)


What else can I use this for?

The screengrab tool integrates with the Ffastlane toolsuite right out of the box.

It’s fairly new for Android, so if you haven’t heard about it I totally get it. Here’s a quick synopsis – fastlane lets you, as a developer or release manager, automate your deployment pipeline. From integrating with continuous integration taking screenshots, to placing them into device frames (currently iOS only though, hopefully Android soon! Hint Hint Fabric team!),  to upload the files to Google Play automatically. Fastlane helps you automate the deployment process of your Android apps. Check out fastlane for more detailed info.

The screengrab tool has a few additional use cases:

  • Design/Product Manager Review
    • Keep your product and design teams up to date with all of the screens in your application on a per build basis.
  • Automate Screenshots for release
  • Automate Screenshot automation for internal dog fooding and review processing with other tools.
  • … and of course, to validate what might have gone wrong during a test.

Does this replace my other screen capture tooling?

No,  screengrab complements the existing toolchain that is out there. If you need/want to use your other solutions, feel free to keep using it. Screengrab is just another tool in your toolbox.

Pragmatic Development Tooling

I’m very pragmatic in my day to day development. When I do internationalize my next app (which I’m actually doing in the next month or two) I will be reaching for screengrab as the tool to help sanity check my work.

Why?

It’s simple. It’s easy. It helps me solve a problem and it gets out of my way. I don’t need to write the tool myself. It just works.

As with anything new, it has a purpose and it now occupies a space in my toolbox. Maybe it will help you save some time too.

Filed Under: Development, Mobile

Why Podcasts Have Become Popular

January 3, 2016 by Donn Felker 1 Comment

Photo on 5-7-15 at 6.17 PM #3

The way we consume video content is changing.

Netflix. Hulu. You Tube. HBO Now. Amazon Instant Video. DVR.

The way we communicate is changing.

Email (always is popular). SMS/Text. WhatsApp. Facebook Messenger. Voxer. Telegram.

The way we physically get around is changing.

Uber. Lyft. Sidecar. Curb.

The way we listen to audio is changing.

iTunes. Google Play Music. Spotify. Pandora. Rdio (RIP)

The way we educate is changing.

Kahn Academy. Code.org. Code Academy. MIT/Standford/Etc Free Online Classes.

The way we research things changed about two decades ago.

The Internet. Wikipedia. Blogs.

What do all of things have in common?

They’re all on-demand.

We live in a world where we can now determine when and where we will reply to a text message or email. We get to watch what we want to watch when we want to watch it. We get to usher a cab/ride when we need to go somewhere at any point in the day. We get to listen to the music that we want to listen to when we want to listen to it. We get to learn what we want to learn when we want to learn it.

Many industries are getting disrupted by the on-demand economy.

Radio has been changing for years

Radio is ineffective because it’s live. I can only listen to what is on, right now, pre-programmed by someone who has tastes that are marginally similar to mine.

Don’t like a song?

Too bad. Listen to it.

Don’t like this ad?

Too bad. Listen to it.

Podcasts Are On-Demand Radio

That’s all there is to it. They’re on-demand radio that give you the ability to fast forward, rewind, save for later, etc.

Can’t listen to it now?

No problem. Listen to it later when you have time.

Can’t listen to the whole show?

No problem. Listen to the rest when you have time.

Miss something?

No problem. Hit rewind and listen to it again.

This is one of the reasons why Howard Stern remains a powerhouse on Sirius/XM. Though his show is not a podcast it is consistently replayed all day and through his off time during the weeekends/etc. If fans miss a show, they can tune in and catch it any time of the day. Without this, his show would be far less popular, IMO. Unfortunately not everyone can listen to it at any time they want but this consitent replay exposes his show as an on-demand show. Listeners listen during the day when they have time.

This is exactly why podcasts are becoming popular.

Podcasts are On-Demand Radio.

Download it and listen to it when you have time. Today. Tomorrow. Next week. Whenever.

That is why Podcasts are becoming popular.

If you’re an Android Developer/Mobile Developer you might like my podcast – Fragmented. Its a podcast about Android Development that I host with Kaushik Gopal.

Filed Under: Business, Development, Marketing, Misc, Mobile Tagged With: Android, Productivity

Killing Your Project Quietly – The NIH Assassin

December 9, 2015 by Donn Felker 2 Comments

nih-syndrome
Image by daviddoctorrose via creative commons

NIH (Not Invented Here) syndrome is a condition in which developers (or business owners/managers) feel that they need create something themselves instead of using a perfectly viable existing solution.

This usually manifests itself in the form of “That costs to much, let’s build it ourselves and save the money.”

Funny thing is … this usually costs exponentially more in the long run.

NIH Syndrome can kill your project/company faster than you think.

Let me explain why…

Let’s assume you’re evaluating an analytics package for your web or mobile application.

You have two options here –

  • Use an existing off the shelf product (Google Analytics, Keen, MixPanel, Localytics, etc – there’s a ton out there). These range anywhere from free up to a couple hundred a month – anywhere in that range.
  • Build an analytics package yourself (cost: You think its free, ohhhhhh not so fast – it’s not).

You opt with option #2 – build it yourself. RE: None of the existing analytics packages provide the functionality you need so you decide to build your own.

Bad move.


1449686986_thumb.jpeg

Most likely an existing product/service will do the job for 80%-90% of the companies out there, for the majority of their use cases. With a little tweaking you can get everything you need out of it. You just need to understand the tools.

Most business savvy and time conscious companies will decide to use the existing service instead of building it themselves. These companies realize that they are not in the market for creating a new analytics package. Unfortunately, not all companies are that fortunate.

I’ve consulted for companies where engineers go rogue and build everything themselves because they feel their solution is superior.

This is a problem.

Unfortunately these diversions are exactly what end up costing the company tons of time and money and it could have all been avoided if the proper questions would have been asked. When NIH Syndrome rears its ugly head often enough the team becomes so distracted with their own creations (aka: Shiny Object Syndrome) that the engineering department begins to slow down product development due to the new distraction that has nothing to do with their market.

How do you know if you’ve developed NIH Syndrome?

I tend to use this steadfast heuristic as a baseline for all NIH syndrome based evaluations.

If you ever find yourself saying or thinking …

“We don’t need that, we can build that ourselves.”  or “That costs too much, we can build it ourselves for cheaper.”

Then you most definitely suffer from NIH Syndrome…

You may also suffer from NIH syndrome if you insist that you must …

  • build your own analytics package
  • build your own status page
  • implement your own encryption algorithm
  • build your own blog solution from scratch
  • build your own internal testing tools when existing ones work better but you lack the understanding
  • build your own monitoring software
  • build your own API protocol
  • implement your own CSS language
  • build your own logging framework
  • build your own router

Sure, there are exceptions to the case, but if you’re a small company then there is no reason to be building solutions that do not serve your target market.

When is NIH Syndrome not a syndrome?

When the existing solutions truly do not match your business needs!

If you find that the existing solutions are far more cumbersome to use than building something new and you can validate that with numbers (time vs effort vs ROI, etc) then go for it.

So… how do you go about validating if something is worth building vs using an off the shelf solution?

Evaluating Off The Shelf Cost vs Build It Yourself Cost

Every time you start to think “I can build that” or “Thats expensive, let me build it” perform this quick task:

Ask yourself this – How much time do I think it would take to build, support, bug fix and feature enhance a custom solution that matches the existing off the shelf product? Take the number of hours, multiple it by $100/hr (yes your time is worth that much – at minimum) and then look at that number.

I bet you its over $5,000 at a minimum if not $8,000-$10,000 or more! For some solutions its probably closer to 25k-50K.

Furthermore, that number is for your quick and dirty approach not a polished app like the ones you can buy on a monthly subscription.

Now look at the the price of the existing solutions. Take that number and multiply the monthly price times 3 and times 6 (You’ll be able to figure out if a solution works well for you at 3 months and most definitely by 6 months).

Lets say the off the shelf solution is $150 a month. I know what you’re thinking “Whoa, thats a lot” .. not really when you look at the numbers though!  150 * 3 = $450, 150 * 6 = $900

How much money would you rather spend? $900? or $5K-$10K?

I’d rather spend the $900. I’m sure you would too.

The Hidden Gotcha

gotcha

Here’s the hidden gotcha about NIH Syndrome – if you do decide to build something yourself you also lose all inherient momentum you’ve gained working on your product. All of your engineers time, effort and mental energy gets put into this infrastructure component instead of pushing the product forward.

When you suffer from NIH syndrome, not only do you lose money in the long run by building it yourself, but you lose money by losing market share and attracting new customers.

The next time you begin to get the feeling of “we can build that ourselves” (for any reason) go back to the cost section above and run some quick mental math. Remove the emotion and make a logical decision and use something that exists so you can go back to serving your customers by building your product, not a new shiny object.


Filed Under: Business, Development, Marketing, Mobile Tagged With: Android

RxJava with AIDL Services

September 8, 2015 by Donn Felker 8 Comments

Most contrived Rx examples show you how to replace AsyncTask with Rx. Not many examples show how to abstract away complex async scenarios, such as oneway AIDL Bound Services. Using RxJava with AIDL Services will help us clean up the interface to consume the AIDL service – making it less … gross and easier to work with.

Assume you want to connect to a Bound Service which is
created through AIDL to get some data. Let’s also assume that all the calls on that bound service are oneway calls (async with a callback listener). In order to get the data you need you will have to set up a ServiceConnection then once connected you need to then use the service object to request the data. Since the connected service (AIDL Service) you’re working with only has oneway calls you basically have two layers of indirection you have to deal with before you can get at the data. For example – Suppose we pass in a orderId and we get an Order object back from the bound service … we have to wait for two async calls to complete in order for that to happen:

  1. Connecting the Activity to the bound service via the ServiceConnection
  2. Making the async call on the service after connection, passing in a callback listener to be called when the data is returned.

Currently anytime I need data I have to connect to a service, wait … query the service, wait … and then get a callback. If I need to make multiples of these types of calls things can get hairy, fast.

The goal here is to wrap this code up somewhere and abstract away the details and simply have an interface that returns Observable<Order> getOrder(long orderId);

Here’s how I’ve gone about implementing this … (full gist).


In the constructor I connect to the bound service with the bindService call. This is async. Once connected in the ServiceConnection I call onNext on the BehaviorSubject that holds the reference to the boundService. Since no one is listening yet, no big deal. That class just hangs outs and waits.

When an interested party subscribes to the getOder call, we return:

PublishSubject<Order>.asObservable()

This way the caller doesn’t know they’re working with a subject (which is recommended).

In that method I subscribe to the orderServiceSubject. If the service connection is still in flight, no big deal – Rx will allow us to wait until onNext on the orderServiceSubject is called. If the service connection has succeeded then the subscriber to orderServiceSubject will get it’s on next called with the bound service as its parameter.

Once we have reached this point, we have a bound service object that we can call methods on. Remember, these methods are set as ‘oneway’, meaning that they are also async and we must supply a callback listener that gets called once the work is complete (at this point it is starting to resemble JavaScript all of a sudden, like whoa).

Inside of this listener (the anonymous Stub class) we use the PublishSubject – orderSubject and call its onNext with the value that was returned. This will propagate the value all the way back to the activity and then we can do whatever we want with it.

As you can see, we can abstract away the nasty AIDL code behind Rx and make it a lot cleaner. Now the client can use RxJava and get the the benefits of Rx without dealing with the ugly guts of the AIDL system.

Special thanks to Dan Lew for proof reading this article.

Here’s the full implementation with an example of how you’d implement this with an Activity.

Filed Under: Development, Mobile Tagged With: Android, rxjava

Quick and Easy StateListDrawables in Android with ONE PNG

June 29, 2015 by Donn Felker 3 Comments

Update: This can now be accomplished with  DrawableCompat that is now available in the Support Library. Use the DrawableCompat#setTintList() method to accomplish the same thing as shown below.

One of the things that used to drive me (and my designer co-workers) crazy was that we needed to create a full stack of various PNG’s to create different states on our drawables. That means if I wanted a button with a white default state, orange pressed state and grey disabled state I’d have to create three PNG’s (for each density) … which … as you know is a huge number of PNG’s and a real pain to update when the time comes.

One Png To Rule Them All

I’m not the first to come up with this solution, but I figured its a good time to share it so its out there. This is not a one size fits all solution (see the conclusion at the end for more info), but it does give you a good jumping point and if you’re building state list drawables. You can see how this would help you simplify some of your icons by only having to create one.*

With this solution we have one PNG and then we use some Java code to create a StateListDrawable at runtime. This allows us to have one default PNG and then change the colors at runtime with just code.

Place the code below in a file called DrawableUtil.java and put it somewhere in your project.

public class DrawableUtil { 

    public static StateListDrawable getStateListDrawable(Context context, @DrawableRes int imageResource, @ColorRes int desiredColor, @IntRange(from = 0, to = 255) int disableAlpha) {

        // Create the colorized image (pressed state)
        Bitmap one = BitmapFactory.decodeResource(context.getResources(), imageResource);
        Bitmap oneCopy = Bitmap.createBitmap(one.getWidth(), one.getHeight(), Bitmap.Config.ARGB_8888);

        Canvas c = new Canvas(oneCopy);
        Paint p = new Paint();
        int color = context.getResources().getColor(desiredColor);
        p.setColorFilter(new PorterDuffColorFilter(color, PorterDuff.Mode.SRC_IN));
        c.drawBitmap(one, 0, 0, p);

        // Create the disabled bitmap for the disabled state
        Bitmap disabled = BitmapFactory.decodeResource(context.getResources(),imageResource);
        Bitmap disabledCopy = Bitmap.createBitmap(disabled.getWidth(), disabled.getHeight(), Bitmap.Config.ARGB_8888);

        Canvas disabledCanvas = new Canvas(disabledCopy);;
        Paint alphaPaint = new Paint();
        alphaPaint.setAlpha(disableAlpha);
        disabledCanvas.drawBitmap(disabled, 0, 0, alphaPaint);

        StateListDrawable stateListDrawable = new StateListDrawable();

        // Pressed State
        stateListDrawable.addState(new int[]{android.R.attr.state_pressed}, new BitmapDrawable(oneCopy));

        // Disabled State
        stateListDrawable.addState(new int[]{-android.R.attr.state_enabled}, new BitmapDrawable(disabledCopy) );  // - symbol means opposite, in this case "disabled"

        // Default State
        stateListDrawable.addState(new int[]{}, context.getResources().getDrawable(imageResource));

        return stateListDrawable;
    }

}

The code above creatse a StateListDrawable that will return a Drawable that has three states:

  • Default – The default image (imageResource)
  • Pressed – The default image, colored with the color param (desiredColor)
  • Disabled – The disabled state image is the default image (above) but has the opacity set to the value that is passed in (disableAlpha)


How to Use It

Simply call the static method with the required parameters and it will return a StateListDrawable that you can use to set the background of any image that can have state (like a Button, ImageView, etc).

myImageView.setBackground(DrawableUtil.getStateListDrawable(context, R.drawable.ic_user_dark, R.color.white, 127)); // 127 = 50% in 0…255 alpha

Now, if for some reason you want to change the color of the pressed state, simply change the color value that is passed in – say changing R.color.white to R.color.red and have the new selected image be red. All done with a simple code change.

If you want to get advanced you could use the Pallete lirbary to help get your colors and colorize your icons based upon the theme of the image that is composing the screen, the PocketCasts team does a great job of this in their player.

Here’s what it looks like if we use a user icon, set the pressed color state to red and the disabled to 90.


Why Did I Use This

There are a couple of other support library implementations that we could have used (shown below). The reason why this implmentation was used over the others is because I wanted to keep the default state of the PNG intact. What do I mean? I wanted to use a PNG that looked like this as the default state (not pressed, nor disabled):


When pressed though, I wanted the image to look like this:

Other Implementations such as DrawableCompat.setTintList() would not allow me to keep the original drawable.


Other Implementations

On the /r/androiddev comments for this article it was brought up that you can use DrawableCompat to wrap and set the tint list on the drawable. This is correct, somewhat. A problem occurs when you want to perform what I set out to do above – keep the original drawable but tint the other states. If you don’t care about keeping the original color (or simply want to change it anyway) you can use the DrawableCompat with great success like this:

Drawable logoDrawable = getResources().getDrawable(R.drawable.ic_agilevent_logo);
Drawable tintableDrawable = DrawableCompat.wrap(logoDrawable);
DrawableCompat.setTintList(tintableDrawable, getResources().getColorStateList(R.color.logo_color_selector));
DrawableCompat.setTintMode(tintableDrawable, PorterDuff.Mode.SRC_IN);
myImageView.setBackground(tintableDrawable);


The R.color.logo_color_selector looks like this:

&lt;?xml version="1.0" encoding="utf-8"?&gt;
&lt;selector xmlns:android="http://schemas.android.com/apk/res/android"&gt;
&lt;item android:state_pressed="true" android:color="@color/red" /&gt;
&lt;item android:state_enabled="false" android:color="@color/green" /&gt;
&lt;item android:color="@color/blue" /&gt;
&lt;/selector&gt;


Conclusion*

The new material design support libs out there you can do some of the same things I’m showing above, but some have still opted for this solution as they’re not 100% material (or not going material at all).

This is one of many solutions to a very common problem. It does not mean that you have to use this, in fact if you’re using v21+ you can use android:tint attribute to colorize android pngs. You can also use the android colorFilter to do the same thing we’re doing above. Like I said, there are a few ways to do this, but this is one way where you create advanced state list drawable in code.

Lastly, there is also a TintImageView that is present in the android.support.v7.internal.widget.TintImageView that has very similar settings. The code to use it looks like this:


&lt;android.support.v7.internal.widget.TintImageView
android:layout_width="wrap_content"
android:layout_height="wrap_content"
android:background="@drawable/ic_icon"
android:backgroundTint="@color/green"
android:backgroundTintMode="src_over"/&gt;

However, I would advise against using this as this is inside of the internal package inside of android.support.v7. Traditionally anything inside of an internal package name indicates that it is not a public API that should be consumed or relied upon. Choose to use it at your own risk. 🙂

Filed Under: Development, Mobile Tagged With: Android, Productivity, programming

Next Page »
Donn Felker Google Android GDE Fragmented - An Android Developer Podcast

Projects / Apps

Caster.IO
Fragmented Podcast
American Express Android
Aaptiv
AndroidJobs.IO
Groupon
MyFitnessPal
Poynt

Books

  • Android Developer Tools
  • Android App Dev For Dummies V2 (V1)
  • Android Tablet App Dev for Dummies

Categories

  • Book
  • Business
  • Development
  • Health
  • Marketing
  • Misc
  • Mobile
  • Podcast
  • Screencasts
  • Uncategorized